Excel’s Secret Weapon: Centering Worksheets Like a Pro
In the vast ocean of Excel’s capabilities, from complex formulas to creating dynamic charts, there’s one simple yet incredibly effective tool lurking beneath the surface for anyone who wants their spreadsheets not just to work seamlessly but also to look professional and appealing: Centering Worksheets.
It’s something that doesn’t get enough spotlight but believe me, when it comes to printing your data or presenting it in a visually engaging manner, this feature is your best friend. Let’s dive into how you can harness the power of Excel to center those worksheets, making sure your work looks as sharp and focused as your analysis.
Why Center Worksheets?
Before we get into the how, let’s talk about the why. Centering your worksheet vertically or horizontally on the page does more than just enhance its aesthetic appeal. It ensures that your data is neatly presented, avoiding any unnecessary white spaces on either side when printed. This is especially crucial for reports, presentations, or any document that’ll be shared with others. It reflects attention to detail and professionalism.
Quick Steps to Centering Glory
Centering worksheets in Excel is not rocket science; however, it’s a feature often overlooked by many. Let’s break down the process into simple, digestible steps to get you from zero to hero:
1. Kickoff with Page Layout
First things first, open your Excel worksheet and navigate to the Page Layout tab. This is where all the magic begins. It might seem like just another tab, but within it lies the key to transforming your worksheet’s presentation.
2. Dial into Page Setup
Within the Page Layout, you’re looking for the Page Setup dialog box. A small arrow at the bottom right corner of the Page Setup group is your gateway. Click on it, and you’ll find yourself in the midst of various options to tweak your worksheet’s appearance.
3. Command Your Worksheet to Align
Here’s where you decide how you want your worksheet to take center stage. The Page tab within the dialog box has a section labeled Center on Page. Here, you have the freedom to choose either Horizontally or Vertically or go for both if your worksheet demands it.
4. Apply and Admire
After making your selection, hit OK. Voila! Your worksheet now sits proudly centered, ready for whatever task you had planned for it.
Automate to Accelerate
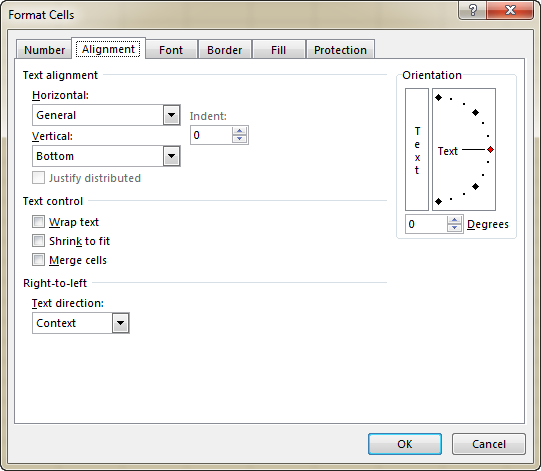
For those who find themselves frequently centering worksheets, Excel hasn’t left you high and dry. Automating the centering process can save you heaps of time. Select multiple worksheets, right-click, and choose Format Sheet. Within the Alignment tab, select “Center” under the Horizontal alignment section, and apply. All your selected worksheets will now echo your command in unison.
Enhancing Your Centering Skills
Now that you’re acquainted with the basics, let’s up the ante. Excel is all about customization, and centering worksheets is no exception. Here are a few pro tips to ensure your centered worksheets stand out:
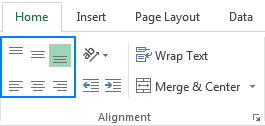
- Merge for Impact: Occasionally, you might want not just to center the worksheet but also certain titles or data within it. Use the Merge and Center tool available under the Home tab for this. It combines and centers the selected cells, perfect for headings.
- Keyboard Shortcuts: For the speed enthusiasts, keyboard shortcuts are your ally. Simply select your cells and Ctrl + E will center them swiftly.
- Bigger and Bolder: To make sure your centered titles capture the attention they deserve, don’t shy away from adjusting the font size and style. A larger, bolder font can make all the difference.
- The Preview Pane: Before committing to print or share your document, always take a peek at how your centered worksheet looks in the Print Preview. It gives you a chance to make any last-minute adjustments.
Concluding Thoughts
Centering worksheets in Excel might seem like a minor tweak, but its impact on your document’s presentation is undeniable. It’s about creating a visually balanced and professional look that complements the hard work you’ve put into compiling and analyzing your data.
Remember, the ethos of Excel is not just about handling data but also about presenting it in the clearest and most effective way possible. With these tips and tricks under your belt, you’re well-equipped to make sure your worksheets not only function optimally but also look their best.
And so, as you venture back into your Excel spreadsheets, remember that amidst the formulas and charts, the simple step of centering your worksheet can significantly elevate the clarity and impact of your data presentation. Happy centering!
Crafting Titles That Captivate
When it comes to worksheets, titles are more than just a formality; they’re the marquee that draws the viewer’s attention. Crafting a title that’s both captivating and informative sets the tone for the data that follows. Centering your worksheet title not only gives it the prominence it deserves but also aligns it visually with the data it represents, creating a cohesive and polished appearance.
Creating Your Centerpiece
- Highlight Your Title: Select the cells that contain your title. This could be a single cell if your title is compact or multiple cells if you’re aiming for a broader banner.
- Command Center: Navigate to the Home tab and look for the Alignment group. Here, click on the Center icon. This moves your title text into the perfect center of the selected cells.
- Dress to Impress: While a centered title is good, a bold and appropriately sized title is better. Still within the Home tab, tweak the font size and style to make your centered title stand out. Bold, italicize, or even change the color – whatever aligns with the overall theme of your worksheet.


Beyond Centering: The Art of Arrangement
Centering your worksheets is just the beginning. The real art lies in arranging your data in such a way that it complements this center alignment, enhancing both readability and visual appeal.
- Balancing Acts: Ensure your data is equally distributed on both sides of the center line. This balance maintains a visually pleasing symmetry that makes viewing your data a pleasant experience.
- Embrace the White Space: While the instinct might be to fill every inch of space, strategic use of white space can actually enhance your worksheet’s appearance and readability. It acts as a breathing space for your data, allowing each piece to stand out.
- Consistent Styling: Consistency in font sizes, styles, and colors throughout your worksheet not only looks professional but also helps in distinguishing different sections or types of data at a glance.
The Final Look: Preview and Print
You’ve centered your worksheet, crafted an engaging title, and arranged your data beautifully. Now, it’s time for the final step: previewing and printing.
Preview Like a Pro
Before hitting that print button, take a moment to preview your worksheet. This gives you an overview of how your centered layout translates to paper. If adjustments are needed, it’s easier to tweak now than after printing.
Print with Precision
- Adjust the Margins: If your worksheet is slightly off-center on the preview, adjusting the margins can help realign it to perfection.
- Select the Right Printer Settings: Ensure your printer settings match the layout and size of your worksheet. A mismatch here can lead to parts of your worksheet getting cut off.
- Quality Checks: Finally, select the appropriate quality settings on your printer. A beautifully designed worksheet deserves to be printed in the best quality possible to do justice to your hard work.
In Conclusion: The Centered Path
The journey to creating a visually appealing and professionally polished worksheet in Excel involves more than just data analysis. By centering your worksheets, crafting engaging titles, balancing arrangement, and ensuring a perfect print, you elevate your work from mere numbers on a page to a compelling visual narrative.
Remember, every spreadsheet tells a story, and how you present that story can significantly impact its reception. With these skills in your Excel toolkit, you’re not just a data analyst; you’re a data artist, painting stories with numbers. So, go ahead, center with confidence, and watch your worksheets transform into masterpieces of clarity and visual appeal.
Frequently Asked Questions (FAQ)
Q1: Can I center worksheets in Excel using a Mac?
Yes, you can center worksheets in Excel on a Mac just as easily as on Windows. The steps are essentially the same: navigate to the “Page Layout” tab, access the “Page Setup” dialog, and select the centering options under the “Margins” or “Sheet” tab depending on your version of Excel.
Q2: Will centering my worksheet affect how it looks on the screen vs. when printed?
Centering affects the print layout of your worksheet more than how it looks on the screen. When you choose to center the worksheet, it’s primarily for printing purposes, ensuring the worksheet is centered on the printed page. On the screen, you’ll mostly notice alignment changes when you’re in “Page Layout” view.
Q3: Is it possible to center a worksheet both horizontally and vertically at the same time?
Absolutely! In the “Page Setup” dialog box within the “Page Layout” tab, you have the option to select both “Horizontally” and “Vertically” under “Center on page” options. This will center your worksheet in both directions on the printed page.
Q4: Can I apply centering to multiple worksheets at once?
Yes, you can apply centering to multiple worksheets simultaneously by first selecting all the worksheets you want to modify (hold down CTRL or SHIFT to select multiple sheets), and then following the steps to center as you would for a single worksheet. Changes will apply to all selected sheets.
Q5: Are there any keyboard shortcuts to quickly center cells or text within cells in Excel?
To quickly center text within cells, you can use the keyboard shortcut Ctrl + E (in newer versions of Excel) or Alt + H, A, C to center text horizontally. However, these shortcuts center text within cells and do not center the worksheet on the page.
References and Citations
For further reading and more detailed instructions, please refer to the following external links:
- Microsoft Support – Center a worksheet both horizontally and vertically on the page: This official Microsoft guide provides a step-by-step approach to centering your worksheet using Excel’s native features. Link to Microsoft Support
- Exceljet – Excel Keyboard Shortcuts: An extensive list of Excel keyboard shortcuts, including shortcuts for alignment and other formatting tasks. Link to Exceljet
- Office Articles – Better Excel Spreadsheets: Offers insights into making Excel worksheets more readable and professionally presented, including centering and other formatting tips. Link to Office Articles
Please note that accessing these links will take you to external sites, where the content is updated regularly to stay relevant with the latest versions of Excel and may provide more in-depth tutorials or videos to enhance your learning experience.

